Build Your First AR-15: A Step-by-Step Guide for Beginners
Building your first AR-15 is a rewarding project for new firearm enthusiasts. Beginners eager to assemble their rifles will learn about key components like upper and lower receivers, barrels, and bolt carrier groups. The process is straightforward and safe if you have the foundational knowledge to customize a reliable rifle.
Key Components of the AR-15 Rifle
The AR-15 rifle has two primary parts: the upper and lower receivers. The lower receiver includes the trigger group, magazine well, and buttstock, forming the rifle’s backbone. The upper receiver holds the barrel, bolt carrier group (BCG), and handguard.
Essential Parts for Your AR-15 Build
Starting your beginner AR build requires a solid grasp of the key components and their functions.
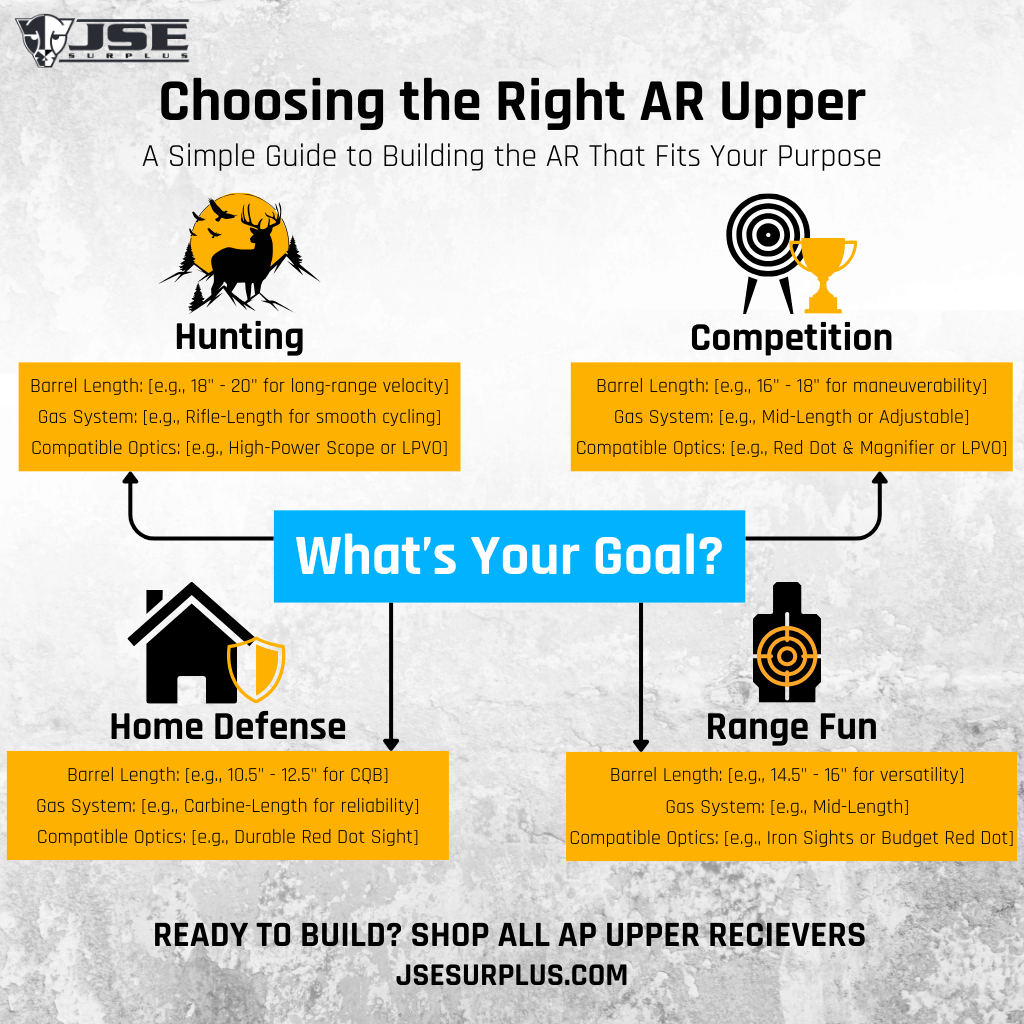
Choosing the Right Upper and Lower Receivers
The AR-15 upper and lower receivers are the backbone of your rifle. The lower receiver, which is the serialized part, includes the trigger assembly, magazine well, and buffer tube. The upper receiver houses the barrel, bolt carrier group (BCG), and often the handguard.
Selecting Barrels and Bolt Carrier Groups (BCGs)
The barrel affects accuracy and handling. Options vary in length, material, and rifling type, each influencing performance. Chrome-lined and Nitride finished barrels resist corrosion and last longer, while stainless steel barrels are renowned for precision. The BCG is responsible for cycling the action.
Triggers and Handguards
A good trigger enhances accuracy and control. Single-stage triggers offer a straightforward pull, while two-stage triggers provide a take-up before the break. Handguards protect your hands from heat and offer accessory mounting points. Free-floating handguards can boost accuracy by reducing barrel contact, whereas drop-in handguards are easier to install and sometimes are more budget-friendly.
Choosing the Right AR-15 Caliber
Selecting the right caliber tailors your AR-15 to its intended use. The .223 Remington/5.56 NATO is the most common choice due to its versatility and availability. Other options like .300 Blackout or 6.5 Grendel offer benefits such as increased stopping power or extended range.
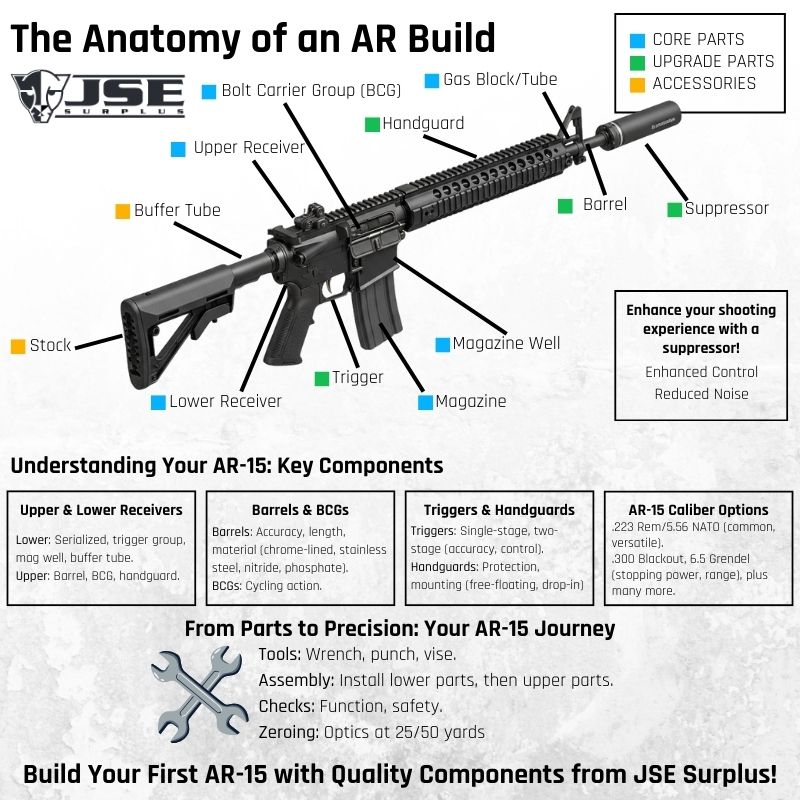
Tools and Safety for AR-15 Assembly
Building your first AR-15 requires an AR-15 parts list. Tools include an armorer’s wrench for tightening barrel and castle nuts, a torque wrench to secure components to the correct specifications, roll pin punches for installing pins without damage, and a bench vise with a vise block to stabilize the receiver.
AR-15 Assembly Guide
Putting together your AR-15 step by step is where the real excitement begins.
Assembling the Lower Receiver
- Install the Trigger Group: Begin by assembling the trigger, hammer, and disconnector. As you install the hammer and trigger pins, note that you have the option to upgrade to more secure anti-walk or non-rotation pin sets instead of the standard pins found in most lower parts kits (LPKs).
- Install Basic Controls: Next, fit the magazine catch assembly and the bolt catch. After installation, check that both mechanisms move smoothly and function correctly.
- Attach the Trigger Guard: If your lower receiver does not have a trigger guard built into the forging, install the separate trigger guard now.
- Assemble the Pivot Pin: Install the pivot pin, followed by its small detent and spring.
- Prepare the Takedown Pin: Install the takedown pin with its slot facing the hole for the detent and spring. Insert the detent and spring into the receiver.
- Install the Buffer System: Slide the buffer tube (receiver extension) onto the lower receiver, followed by the end plate and the castle nut.
- Crucial Step: Hold the detent spring down while sliding the end plate down against the receiver to hold the spring in place. Finger-tighten the castle nut.
- Stock Type Note: If you are using a collapsible (adjustable) stock body, use an armorer’s wrench to tighten the castle nut. For fixed stocks (A2-style), they use a different buffer tube, and the stock body itself will capture the takedown pin detent and spring.
- Finalize the Assembly: Install the buffer and buffer spring into the tube. Finish this stage by installing the selected stock body.
Function Check
Before moving on, confirm that all new parts work safely:
- Test Safety and Trigger: Test the safety selector to confirm that the trigger cannot trip the hammer when the rifle is set to the Safe position.
- Test Trigger Reset: Pull the trigger to drop the hammer. To simulate the cycling of the bolt carrier group (BCG), manually push the hammer down until you hear or feel the trigger reset. Pull the trigger again to confirm it fires.
Assembling the Upper Receiver
Begin by fitting the barrel into the upper receiver and securing it with the barrel nut. Align the gas block and gas tube correctly to ensure proper cycling. Install the handguard. Finally, insert the bolt carrier group and charging handle, checking for smooth operation.
Final Assembly and Function Check
Once both receivers are ready, connect them using the takedown and pivot pins. Perform a thorough function check to ensure everything operates smoothly.
Tips for Zeroing Optics
Zeroing your optics for accuracy ensures your sight aligns with the barrel, enhancing shooting precision. Begin by setting up a target at 25 or 50 yards, which are standard distances for initial zeroing. Use a stable rest or bipod to reduce movement during adjustments.
Start with a mechanical zero by centering the windage and elevation on your optic. Fire a group of shots and note where they land compared to your aim. Adjust the windage and elevation knobs to bring the impact point to your desired zero.
Build Your First AR-15 with Quality Components
JSE Surplus offers a wide selection of quality parts and build kits to help you get started. Whether you need upper and lower receivers, barrels, or complete kits, we provide dependable options for a successful build. Click here to shop our AR-15 parts and build kits, and start your journey to crafting a customized and reliable rifle.
Image Source: Ambrosia Studios/Shutterstock